
Wil jij in Photoshop de achtergrond vervagen van je foto? Met deze tutorial kun je dit op een natuurlijke manier doen, zonder dat je een glow om je onderwerp krijgt. Volg deze makkelijke stap voor stap Photoshop tutorial en probeer het zelf!
Heb jij een foto gemaakt waarbij je de achtergrond eigenlijk te aanwezig vindt? Bijvoorbeeld een portret van je vriend, een mooie bloem in het gras of een blaadje dat je in je hand houdt op een mooie herfstdag? Met deze techniek kun je op een makkelijke manier de achtergrond onscherper maken. En het oogt nog behoorlijk natuurlijk ook!
Photoshop tutorial – achtergrond vervagen in je foto
In deze tutorial gebruik ik een foto van een veld vol zonnebloemen waarbij 1 zonnebloem in de voorgrond zichtbaar is. De foto komt van Unsplash en is een perfect voorbeeld. De bloemen op de achtergrond zijn wel een beetje vaag, maar de foto zou nog mooier zijn wanneer deze bloemen nog wat minder aandacht opeisen. Volg deze stap voor stap Photoshop tutorial en ontdek hoe je de achtergrond natuurlijk kunt vervagen!

Hoe het niet moet: Hierboven zie je twee voorbeelden waarbij de achtergrond onscherp is gemaakt. Links (met het kruis) zie je een waas om de middelste zonnebloem heen. Dat is dus hoe het NIET moet. In deze tutorial leer ik je hoe je het op de rechter manier doet, waarbij je onderwerp echt los komt van de achtergrond.
Laten we beginnen!

Stap 1: Open de foto die je wilt gebruiken en maak een kopie van de achtergrondlaag. Dit doe je in je lagenpalet. Klik met je rechtermuis op de ‘achtergrond’ afbeelding en klik vervolgens op ‘Laag dupliceren…’. Of sleep de foto in het icoontje voor een nieuwe laag.

Stap 2: Zorg dat de kopie van je foto actief is en selecteer je onderwerp. Dit kan op allerlei manieren, maar de makkelijkste manier is met ‘onderwerp selecteren’. Volg mijn eerdere tutorial ‘snel en makkelijk een foto vrijstaand maken‘ om te zien hoe ik dit doe. Zorg ervoor dat je dit netjes doet.
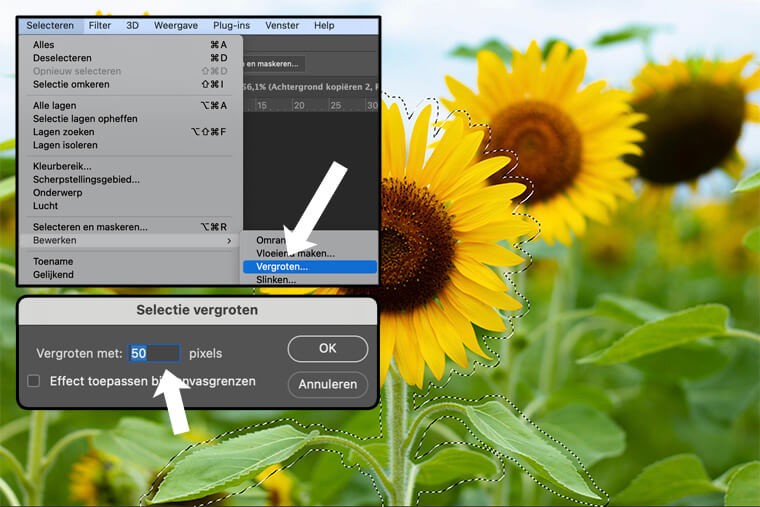
Stap 3: Nu komen de belangrijkste stappen om je achtergrond te vervagen in Photoshop. Zorg ervoor dat de selectie van je onderwerp actief is en vergroot deze een stukje. Hierboven zie je dat de stippellijn om het onderwerp groter is geworden.

Stap 4: Maak een nieuwe kopie van je achtergrond, tussen je ondergrond en je vrijstaande onderwerp in. Zorg dat deze laag geselecteerd is en vul je selectie met behoud van inhoud. Dit doe je met de sneltoetsen SHIFT+F5 of ga naar ‘Bewerken > vullen’ in de menubalk. Je ziet nu dit scherm, zorg dat de inhoud op ‘inhoud behouden’ staat en druk op OK.
Bye bye zonnebloem…

Stap 5: Als je de laag met de zonnebloem uitzet (oogje uit klikken) zie je dat de achtergrond om te vervagen in Photoshop nu is gevuld met onderdelen uit de foto. De voorste zonnebloem is weggewerkt. Het is niet helemaal netjes, maar dat hoeft ook niet. Je zonnebloem komt hier natuurlijk weer overheen te staan.
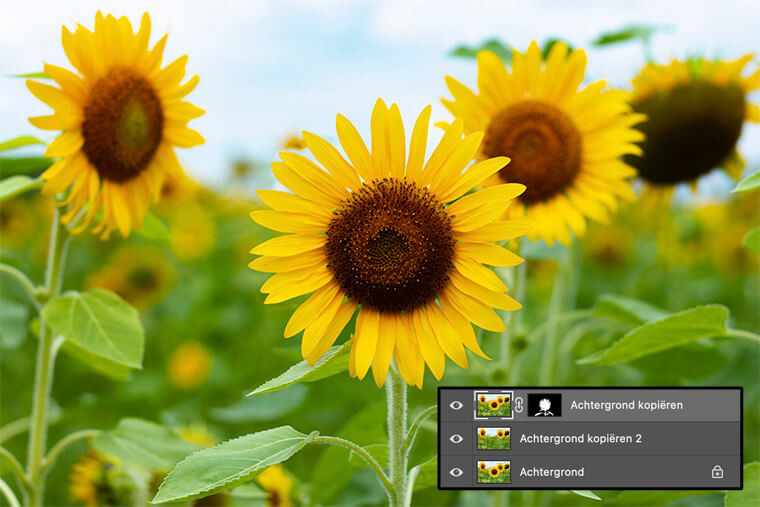
Stap 6: Op dit moment ziet je foto er zo uit. Je lagenpalet is ingedeeld in 3 lagen: onderwerp met masker, achtergrond zonder zonnebloem én de originele foto onderop.
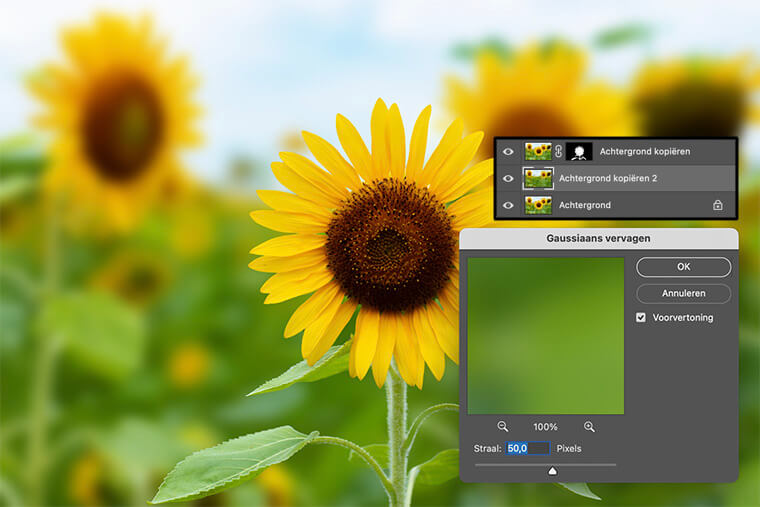
Stap 7: Zorg er nu voor dat je de middelste achtergrond laag, de laag die je wilt vervagen in Photoshop, actief hebt. Ga naar ‘Filter > vervagen > gaussiaans vervagen…’ en kies de straal van je keuze. Hoe hoger dit getal, hoe onscherper de achtergrond wordt. Tevreden? Klik dan op OK. Je kunt ook de andere opties onder ‘vervagen’ uitproberen, hier kun je leuke creatieve effecten mee creëren!
Het eindresultaat van de achtergrond vervagen in Photoshop!

Stap 8: En dan ziet het resultaat er zo uit! Best een verschil met het origineel. Zelf aan de slag? Gebruik hiervoor iedere foto die je maar wilt, maar zorg er wel voor dat de grond niet in beeld is. Het werkt dus niet met portretten die van top tot teen in beeld zijn bijvoorbeeld. Dan gaat je onderwerp namelijk zweven. Maar iedere andere foto met een duidelijk onderwerp en een scherpe(re) achtergrond zijn hiervoor geschikt.
Meer tutorials om uit te proberen:
- Stap voor stap inkt in water fotograferen
- tutorial – schaduwen kleur geven in Photoshop
- tutorial – de reparatie-tool in Photoshop
Hopelijk heb ik je met deze tutorial voor het vervagen van de achtergrond in Photoshop weer een eindje op weg kunnen helpen. Veel plezier en succes!